Bathtub Reglazing in New York City
Licensed & Insured · Free Estimates
Abrasive Bathtub Prep: Why Grinding the Old Surface Matters
Reglazing a bathtub with pour-on enamel is a step-by-step process, and one preparatory stage decides whether the whole job lasts: abrasive prep. Grinding the old surface back to a clean, even, matte profile is what lets the new coating actually bond. Here’s what proper prep involves — and why it isn’t a job to take on with a household tool.
This is the step that decides everything. A finish is only as good as the surface under it. Abrasion is the easiest stage to rush or shortcut on a fast, cut-rate job — and it’s a big reason so many refinished tubs start peeling within a year. We don’t skip it. Every tub gets ground back to a clean, even, matte surface before a drop of coating goes on.
Done right, with the right precautions
Preparing the work area
Abrasive prep throws off a lot of dust, so the room gets set up first. We clear out small items, cover anything that can’t be moved with cloth or plastic sheeting, and seal vents and openings so dust doesn’t spread to the rest of the home.
Respiratory & eye protection
Fine grinding dust and enamel fragments are no joke. A proper respirator and eye protection aren’t optional — especially with power tools, which throw off both dust and hard chips that can injure an unprotected eye.
Tools & method
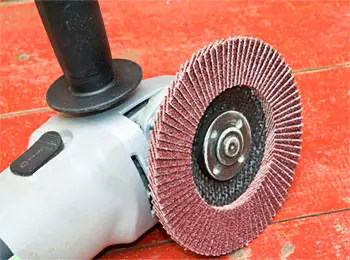
Prep can be done by hand with sandpaper on a block — slower, but less airborne dust — or sped up with power tools like an angle grinder fitted with an abrasive disc. The power-tool route is faster but takes real skill: the surface has to come out evenly, without gouging deeper grooves or leaving uneven spots. That control is the difference between a good base and a ruined one.
Smooth surfaces don’t hold a coating
The point of abrasive prep is a rough, uniform, matte surface the pour-on enamel can grip. Glossy, smooth areas lead to poor bonding and a finish that fails early. The tub’s bottom and curved edges get special attention — they’re easy to miss and critical for adhesion.
We work in several directions — circular, horizontal, and vertical — for full, even coverage, without using so much force that we strip too much away. The goal isn’t to grind down to bare metal; it’s to remove the worn surface layer, rust, and stubborn grime. If the tub was refinished before with epoxy enamel, that old layer comes off completely. What’s left is a slightly rough, uniform surface — no chips, no smooth spots.
Then every trace of dust and debris is removed before coating — a vacuum first, then a final wipe-down or rinse, so nothing contaminates the new finish.
- Rough, even, matte profile across the whole tub.
- Bottom and curved edges fully abraded, not skipped.
- Rust, grime, and any old epoxy finish removed.
- Surface vacuumed and wiped spotless before coating.
Frequently asked questions
Do you sand or grind the tub before refinishing?
Yes. Every tub is abraded to a clean, even, matte profile so the new coating bonds. Skipping this is why cheap finishes peel.
Can I prep and refinish my bathtub myself?
We don’t recommend it. Proper abrasion needs skill and dust containment, and older enamel can release lead dust when ground.
Is grinding an old bathtub dangerous?
It can be. Many pre-1978 tubs have lead in the glaze; grinding releases fine dust, so it needs proper protection and a contained area.
Does refinishing remove lead from my tub?
A proper refinish seals the old surface under a fresh coating, reducing exposure from the original glaze.
Why do some refinished tubs peel so fast?
Almost always poor prep. If the surface isn’t abraded properly, the coating has nothing to grip.
Do you refinish acrylic tubs?
Cast iron and steel only.
Older tubs and lead dust
Here’s a real reason this isn’t a DIY job. Many bathtubs made before 1978 — by some public-health estimates around 75% — used lead in the original enamel glaze, and cast iron and clawfoot tubs are among the most likely to contain it. Grinding or sanding that surface releases fine dust you don’t want to breathe or spread through your home.
That’s exactly why proper prep means a contained work area, real respiratory protection, and a thorough cleanup — not a grinder in an open bathroom. And once the surface is coated, the fresh finish seals the old layer under a new one. Done properly, abrasive prep is part of what makes the result both durable and cleaner than what you started with.
The prep process on video
Proper abrasive prep looks straightforward, but it takes skill and a steady hand — and the precautions matter as much as the technique. It’s the foundation the entire finish sits on, so it’s not a corner we cut. That’s the part of the work you don’t see in the “after” photo, but it’s the part that makes the “after” last.
Want a tub that’s prepped to last — not rushed?
We reglaze cast iron and steel tubs across New York City with the pour-on method, starting with the abrasive prep most jobs shortcut. 3–4 hours of work, ready in about 24, backed by a 5-year warranty.